
 Ekani Ella
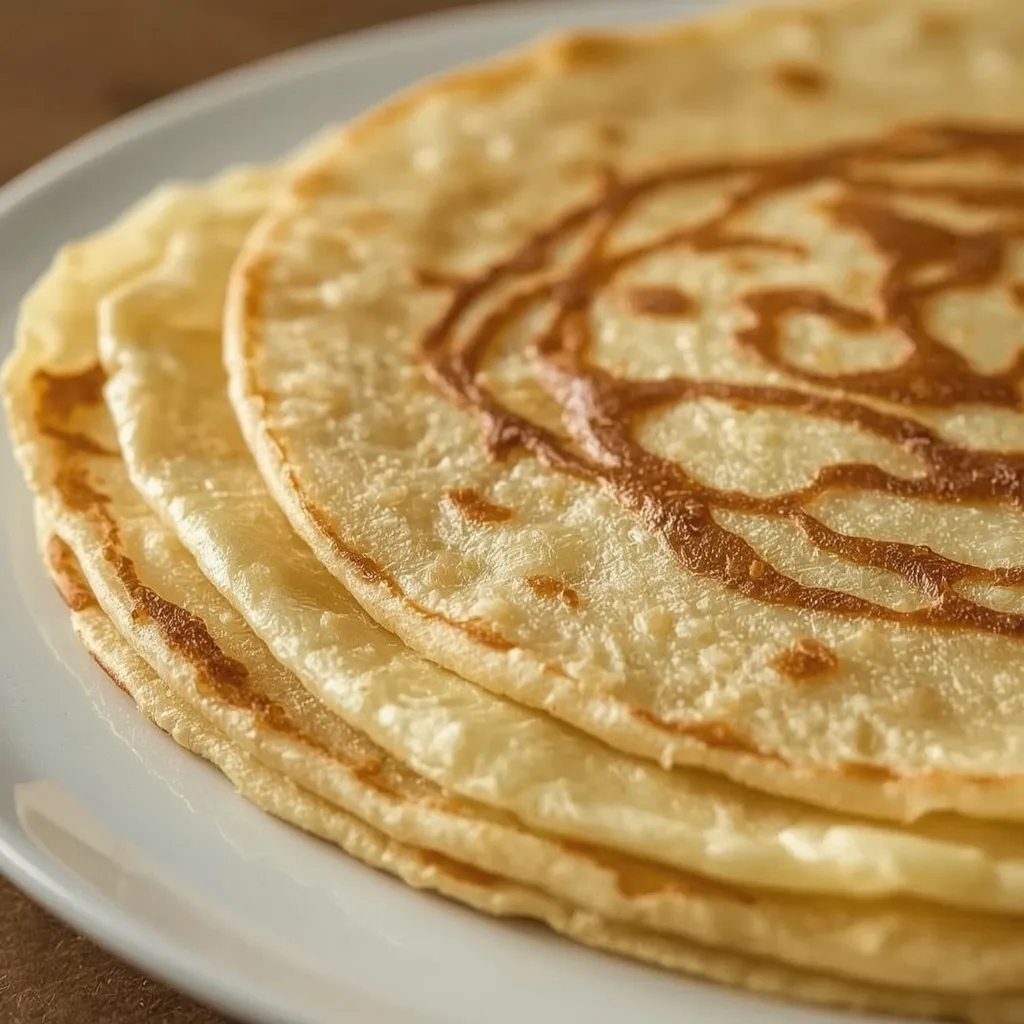
 Mary Berry Crepes deliver exactly what you want from a classic French pancake — whisper-thin, lightly crisp at the edges, and tender enough to wrap around nearly any filling. The batter blends up with just flour, eggs, milk, and melted butter, yet the lacy, golden result always feels special.
You need around 30 minutes from measuring to plating, and the technique is squarely beginner-friendly once you get the pan temperature right. The only slightly tricky moment is that first flip, but by your third crepe, your wrist will know exactly what to do.
What is Mary Berry Crepes?
This is a straightforward French-style crepe made from a thin, pourable batter of all-purpose flour, eggs, whole milk, and melted butter. The mixture gets whisked smooth, rested, then cooked in a hot non-stick pan until paper-thin and freckled with golden-brown spots. The texture lands somewhere between delicate and slightly chewy, with crisp edges that give way to a soft, pliable centre. It is the kind of recipe that works for a lazy Sunday brunch, a quick dessert with lemon and sugar, or even a light supper folded around ham and cheese.
Why This Recipe is Worth Trying
So many crepe recipes overcomplicate things. Here is what makes this one different.
- Dead-simple pantry ingredients — flour, milk, eggs, and butter. Nothing you need to hunt down at a specialty shop.
- Resting does the heavy lifting — 30 minutes of downtime relaxes the gluten, giving you that tender bite without any extra effort.
- No special equipment required — a basic non-stick frying pan and a whisk are all you need to get started.
- Make-ahead friendly — the batter hangs out in the fridge overnight, so breakfast is five minutes away when morning comes.
- Endlessly versatile — sweet or savoury, breakfast or dessert, these crepes shift gears without complaint.
Essential Ingredients to Make Mary Berry Crepes
You probably have most of these in your kitchen already. Each one plays a specific role, so here is what to know before you whisk.
Dry Ingredients
- All-purpose flour (100g / 3/4 cup plus 1 tablespoon), sifted — gives the crepes their structure. Sifting aerates the flour and stops clumps from forming when the milk goes in.
- Granulated sugar (1 tablespoon) — adds a whisper of sweetness without browning too fast in the pan. You can skip it entirely for savoury fillings.
- Fine sea salt (1/8 teaspoon) — just enough to wake up the other flavours. Table salt works in a pinch, but sea salt dissolves more evenly.
Wet Ingredients
- Large eggs (2), at room temperature — the backbone of the batter. Room temperature eggs blend more smoothly and help the crepes set with a silkier texture.
- Whole milk (300ml / 1 1/4 cups) — thins the batter to the right pouring consistency. Whole milk gives a richer result, but semi-skimmed works if that is what you have.
- Unsalted butter (2 tablespoons), melted, plus extra for cooking — adds flavour and stops sticking. Brushing the pan between crepes gives you those signature lacy edges.
- Pure vanilla extract (1/2 teaspoon), optional — brings a warm, round note that pairs beautifully with sweet fillings. Leave it out if you are going savoury.
Handy Kitchen Tools for Best Results
A few well-chosen tools make the process smoother. Nothing fancy, but the right pan genuinely matters here.
- Non-stick crepe pan or 8-inch frying pan — the shallow sides make flipping effortless. A standard non-stick skillet does the job, but a dedicated crepe pan gives you more control.
- Balloon whisk — breaks up flour pockets fast and whips air into the batter. A fork works in a bind, but a whisk saves your wrist.
- Pastry brush — spreads the thinnest, most even layer of butter across the pan. A wadded paper towel dabbed in melted butter is a solid alternative.
- Palette knife or thin spatula — slides under the crepe without tearing it. Look for one with a flexible, offset blade.
- Ladle or 1/4 cup measure — keeps every crepe the same size. Consistency in pouring means even cooking across the whole batch.
Step-by-Step Guide to Making Mary Berry Crepes
Here is the full method, broken down from mixing bowl to warm stack. Take your time with the swirling step — it is the one that makes or breaks the thinness.
- Sift and whisk the dry ingredients — sift the flour into a large mixing bowl, add the sugar and salt, then whisk everything together. Make a well right in the centre for the eggs.
- Incorporate the eggs — crack both eggs into the well. Using a balloon whisk, beat them gently while slowly pulling flour from the edges. Keep going until you have a thick, smooth paste with zero lumps.
- Add half the milk — whisking constantly, pour in about 150ml of the milk in a thin, steady stream. The batter will loosen and turn sleek. Stir in the remaining milk, the melted butter, and the vanilla if using.
- Rest the batter — cover the bowl with cling film and leave it on the counter for at least 30 minutes. This break relaxes the gluten, so the crepes stay tender instead of turning rubbery. Refrigerate for up to 24 hours if prepping ahead, then whisk briefly before cooking.
- Heat the pan — set your pan over medium heat and brush it lightly with butter. The butter should foam and sizzle without smoking. If it browns the second it hits, dial the heat down.
- Pour and swirl — ladle 1/4 cup (60ml) of batter into the centre, lift the pan off the heat, and tilt it in a quick circular motion. Work fast — the batter sets within seconds.
- Cook the first side — return the pan to the heat and let the crepe cook for 1 to 2 minutes. Watch for the surface to look dry and matte, with edges curling slightly away from the sides. Peek underneath with a palette knife — you want golden with scattered lacy brown spots.
- Flip it — slide the palette knife under the crepe and flip, or give the pan a confident toss. Cook the second side for 30 to 60 seconds, just until dotted with pale gold.
- Keep them warm — slide each finished crepe onto a plate and cover with a clean tea towel. The trapped steam stops them drying out while you work through the rest.
- Repeat and adjust — brush the pan with butter every two to three crepes, and ease the heat from medium toward medium-low as the pan gets hotter over time.
- Stack and hold — pile the crepes one on top of the other. If not serving right away, wrap the stack in foil and keep them in a 200°F (95°C) oven for up to 30 minutes.
- Serve your way — sprinkle with sugar and a squeeze of lemon, fold into quarters, and dig in. Nutella, sliced bananas, or a dollop of whipped cream all work beautifully too.
What I Got Wrong (And How I Fixed It)
Crepes seem simple until the first one comes out thick, pale, or torn. Here is what tripped me up the first few times and how to avoid the same frustrations.
- Skipping the sifting step — unsifted flour clumped into tiny pellets that refused to break apart. Sifting takes 20 seconds and saves five minutes of chasing lumps.
- Pouring batter into a cool pan — the crepe spread unevenly and stuck in patches. A properly heated pan makes the batter set on contact in a thin, even sheet.
- Using far too much butter in the pan — the first crepe fried rather than delicately cooked, coming out greasy and heavy. A light brush is all you need.
- Swirling too slowly — by the time I tilted the pan, half the batter had already set in the centre. Lift and swirl immediately, before the batter even thinks about firming up.
- Flipping before the edges released — I tore three crepes trying to force the palette knife underneath. Wait until the edges curl up on their own, then slide under gently.
- Cranking the heat too high throughout — the pan got progressively hotter, and the later crepes scorched before the centres cooked. Ease the heat down gradually as you go.
Healthier Version of Mary Berry Crepes
Small swaps keep the spirit of the recipe intact while lightening things up. None of these changes sacrifice that thin, tender texture.
- Swap half the flour for whole wheat — use 50g whole wheat and 50g all-purpose. You get more fibre without turning the crepes tough or gritty.
- Use semi-skimmed milk instead of whole — cuts the fat by nearly half per serving while keeping the batter pourable and smooth.
- Drop the sugar from the batter — the crepes still taste balanced, especially with naturally sweet fillings like fresh berries or a smear of almond butter.
- Reduce the butter for cooking — a light spritz of non-stick cooking spray between crepes works if you are really watching fat intake. Just make sure the pan is truly non-stick first.
- Fill with Greek yogurt and fruit — a high-protein alternative to Nutella or whipped cream that still feels indulgent.
Ingredient Substitutions for Mary Berry Crepes
Flexibility is built into this batter. Here are the swaps that work without messing up the consistency.
- All-purpose flour (100g) → gluten-free flour blend (100g) — choose a 1:1 blend with xanthan gum. The batter rests the same way, and the crepes hold together well.
- Whole milk (300ml) → oat milk (300ml) — oat milk mimics the creaminess of dairy better than most alternatives. Unsweetened is best to keep the flavour neutral.
- Unsalted butter (2 tbsp) → melted coconut oil (2 tbsp) — adds a faint, nutty sweetness. Use refined coconut oil if you want no coconut taste at all.
- Granulated sugar (1 tbsp) → maple syrup (1 tbsp) — stirs in easily and adds a gentle caramel note. Reduce the milk by half a tablespoon to offset the extra liquid.
- Large eggs (2) → flax eggs (2 tbsp ground flax + 5 tbsp water) — let the mixture sit for 10 minutes until gelled. The crepes will be slightly more fragile, so flip with extra care.
- Vanilla extract (1/2 tsp) → almond extract (1/4 tsp) — almond is stronger, so use half the amount. It pairs especially well with fruit fillings and a dusting of powdered sugar.
Pairing Ideas: What to Serve With Mary Berry Crepes
The fillings and sides can steer this dish anywhere from breakfast to elegant dessert. Here are a few combinations worth trying.
- Classic lemon and sugar — a squeeze of fresh lemon and a sprinkle of granulated sugar let the crepe itself shine. Simple, fast, and never disappointing.
- Nutella and sliced banana — warm crepes melt the chocolate-hazelnut spread just enough to go silky. Bananas add a creamy, sweet contrast.
- Ham and Gruyère — fold shredded Gruyère and thin slices of ham into a warm crepe, then return it to the pan for a minute until the cheese melts.
- Mixed berries and crème fraîche — tart berries cut through the richness of crème fraîche, and the combination feels polished enough for guests.
- Sautéed mushrooms and spinach — earthy, savoury, and satisfying. Cook the mushrooms until golden first so they do not steam the crepe soggy.
- A crisp green salad on the side — if the crepes are the main event, a simple vinaigrette-dressed salad balances the richness and rounds out the plate.
Expert Tips to Make Perfect Mary Berry Crepes
Little details separate good crepes from great ones. These are the tricks I lean on every single time.
- Bring eggs to room temperature first — cold eggs seize up when they hit melted butter, creating streaks in the batter. Pull them from the fridge 30 minutes early.
- Whisk the paste thoroughly before adding milk — that thick flour-egg base is where lumps hide. A perfectly smooth paste guarantees a silky finished batter.
- Rest the batter, no shortcuts — those 30 minutes let the starch granules fully absorb the liquid. The difference in tenderness is noticeable.
- Test the pan temperature with a butter dab — foaming and sizzling without smoke is your green light. Too cool and the crepe sticks; too hot and it scorches.
- Swirl off the heat — lifting the pan away from the burner as you tilt gives you an extra second to spread the batter before it sets in place.
- Butter the pan every few crepes — a quick brush every two to three rounds maintains that non-stick surface and builds those crisp, lacy edges.
- Keep finished crepes under a tea towel — foil traps too much steam and makes them gummy. A cotton towel lets them breathe while staying warm and pliable.
Creative Ways to Customize Mary Berry Crepes
Once you have the basic technique down, the variations are wide open. Small tweaks to the batter or folding style change the whole experience.
- Add orange zest to the batter — finely grated zest from one orange brightens everything. It works beautifully with a Grand Marnier drizzle or dark chocolate filling.
- Fold in fresh chopped herbs — a tablespoon of finely chopped chives or parsley transforms the crepes into a savoury base for smoked salmon and cream cheese.
- Swap vanilla for cinnamon and nutmeg — a pinch of each gives the batter a warm, spiced character that tastes like autumn on a plate.
- Sprinkle the pan with sesame seeds — right after pouring the batter, scatter a few seeds on top before the flip. They toast as the crepe cooks and add a nutty crunch.
- Fold crepes into triangles instead of quarters — spread filling across half the surface, fold in half, then fold again into a wedge. It looks neater and holds more filling.
- Make a crepe cake — layer a dozen crepes with whipped cream or mascarpone between each one. Chill for an hour, then slice into wedges for a showstopping dessert.
Storing Mary Berry Crepes the Right Way
Cooked crepes keep surprisingly well, and the batter actually improves with an overnight rest. Here is how to handle extras.
- Refrigerate the batter overnight — covered tightly, it stays fresh for up to 24 hours. Bring it back to room temperature and whisk briefly before pouring.
- Stack cooked crepes with parchment paper — slip a square of parchment between each one so they do not fuse together. Store in a sealed container or zip-top bag in the fridge for up to 3 days.
- Freeze for longer storage — layer the crepes with parchment, wrap the whole stack tightly in foil, then tuck into a freezer bag. They keep well for up to 2 months.
- Thaw overnight in the fridge — pulling the stack out the night before gives you ready-to-reheat crepes by morning. Avoid thawing at room temperature, which can make them soggy.
- Label and date your freezer bag — crepes all look the same once frozen. A quick note saves you from guessing whether they are two weeks or two months old.
How to Reheat Mary Berry Crepes (If Needed)
Reheating is quick, and each method has its place depending on how many you are warming and how much time you have.
- Dry non-stick skillet over low heat — warm each crepe for about 1 minute per side. No butter needed; the residual fat in the crepes keeps them from sticking. They come out pliable and lightly crisped.
- Microwave a short stack — layer up to four crepes on a microwave-safe plate and heat for 20 to 30 seconds. They soften and steam gently. Cover with a damp paper towel if they have been in the fridge for a few days.
- Oven method for a large batch — wrap a stack in foil and warm at 200°F (95°C) for 10 to 15 minutes. The low heat thaws and heats without drying them out.
- Air fryer for crisp edges — a quick 1 to 2 minutes at 160°C (320°F) revives that slightly crisp border. Fold them loosely so hot air circulates around the surface.
Nutritional Breakdown (per serving)
Based on 1 serving, which equals one-quarter of the total batch — roughly 2 to 3 crepes depending on how thin you pour them.
- Calories: 237
- Protein: about 8g
- Fat: around 11g
- Carbohydrates: 26g
- Fiber: roughly 1g
- Sugar: about 7g
- Sodium: 142mg
FAQs
Can I freeze Mary Berry Crepes?
Yes, and they freeze beautifully. Layer parchment paper between each crepe, wrap the stack tightly in foil, then seal in a freezer bag for up to 2 months. Thaw in the fridge overnight before reheating.
How long does Mary Berry Crepe batter last in the fridge?
The batter keeps well for up to 24 hours in a covered bowl. Bring it to room temperature and give it a quick whisk before cooking — a little separation is normal.
What is the secret to thin Mary Berry Crepes?
Swirling the pan immediately after pouring is the key. Lift the pan off the heat, tilt quickly in a circular motion, and do not hesitate — the batter starts setting within seconds.
Why are my crepes rubbery?
Overmixing the batter or skipping the resting step are the usual culprits. Whisk just until smooth, then let the gluten relax for at least 30 minutes before cooking.
Should crepe batter be thin or thick?
It should coat the back of a spoon in a thin, even layer — thinner than American pancake batter but not watery. If it seems too thick after resting, stir in a tablespoon of milk at a time until it flows easily.
Do I need a special pan to make crepes?
Not at all. A standard non-stick 8-inch frying pan works perfectly. A dedicated crepe pan with low sides makes flipping a bit easier, but it is far from essential.
Try These Recipes
Wrapping It Up
The beauty of Mary Berry Crepes lies in how something so simple can feel so satisfying. A hot pan, a quick swirl, and a stack of golden, paper-thin pancakes ready for whatever filling you are in the mood for. When the batter rests and the pan is just the right temperature, the results are quietly impressive. Give these a go on your next slow weekend morning — you might be surprised how quickly they disappear.
PrintMary Berry Crepes

Delicate, lacy French crepes from Mary Berry’s classic recipe. Made with a simple batter of flour, eggs, milk, and melted butter, these thin pancakes are perfectly crisp-edged and tender, ideal filled with lemon and sugar or your favourite sweet or savoury fillings.
- Prep Time: 10
- Cook Time: 20
- Total Time: 30
- Yield: 4 1x
- Category: Dessert
- Method: Stovetop
- Cuisine: French
Ingredients
- 3/4 cup plus 1 tablespoon (100g) all-purpose flour, sifted
- 1 tablespoon granulated sugar
- 1/8 teaspoon fine sea salt
- 2 large eggs, at room temperature
- 1 1/4 cups (300ml) whole milk
- 2 tablespoons unsalted butter, melted, plus extra for cooking
- 1/2 teaspoon pure vanilla extract (optional)
Instructions
- Sift the flour into a large mixing bowl. Add the sugar and salt, then whisk to combine. Make a well in the centre of the dry ingredients.
- Crack the eggs into the well. Using a balloon whisk, gradually beat the eggs, slowly incorporating flour from the edges of the well. Keep whisking until you have a thick, smooth paste with no lumps.
- While whisking constantly, slowly pour in about half of the milk. Continue whisking until the batter is smooth and evenly thinned. Stir in the remaining milk, the melted butter, and the vanilla extract, if using, until fully combined.
- Cover the bowl with cling film and let the batter rest at room temperature for at least 30 minutes. This resting period relaxes the gluten, ensuring the crepes are tender rather than rubbery. The batter can be refrigerated for up to 24 hours; bring to room temperature and whisk briefly before cooking if chilled.
- Heat a non-stick crepe pan or 8-inch frying pan over medium heat. To test the temperature, brush the pan lightly with butter — it should foam and sizzle gently without smoking. If the butter browns immediately, lower the heat slightly.
- Brush the hot pan with a thin, even layer of melted butter using a pastry brush or a wadded paper towel. Pour 1/4 cup (60ml) of batter into the centre of the pan.
- Immediately lift the pan off the heat and tilt it in a circular motion, swirling the batter to coat the entire bottom in a very thin, even layer. Work quickly before the batter begins to set.
- Return the pan to the heat and cook the crepe for 1–2 minutes. Watch for the surface to look dry and matte, and the edges to start curling away from the pan. Lift an edge with a palette knife to check: the underside should be golden with lacy brown spots.
- Flip the crepe using the palette knife or by confidently tossing the pan. Cook the second side for 30–60 seconds, just until set and dotted with pale gold spots.
- Slide the cooked crepe onto a warm plate and cover with a clean tea towel to keep it warm. The towel traps steam and prevents the crepes from drying out as you cook the rest.
- Repeat with the remaining batter, brushing the pan with butter every two to three crepes or whenever they begin to stick. Adjust the heat gradually from medium to medium-low as the pan gets hotter over time.
- Stack the crepes one on top of the other. If not serving immediately, wrap the stack in foil and keep warm in a 200°F (95°C) oven for up to 30 minutes.
- To serve, sprinkle each crepe with granulated sugar and a fresh squeeze of lemon juice, then fold into quarters or roll up. Alternatively, fill with Nutella, sliced bananas, or whipped cream.
- Crepes can be made ahead: layer with parchment paper, wrap tightly, and freeze for up to 2 months. Reheat in a dry non-stick pan over low heat for about 1 minute per side until pliable and warm.
Notes
Store extra batter in the fridge for up to 24 hours; bring to room temperature and whisk before using. Cooked crepes keep in the fridge for 3 days, layered with wax paper. Freeze for up to 2 months with parchment between each. Reheat: warm individually in a non-stick skillet over low heat for 1 minute per side, or microwave a short stack for 20–30 seconds until pliable.
Nutrition
- Calories: 237
- Sugar: 7g
- Sodium: 142mg
- Unsaturated Fat: 6g
- Carbohydrates: 26g
- Fiber: 1g
- Protein: 8g
- Cholesterol: 116mg
Keywords: Mary Berry crepes, classic French crepes, sweet crepe recipe, thin pancakes, lemon sugar crepes, brunch recipe, simple crepe batter, easy French dessert, Mary Berry recipe, pancake day