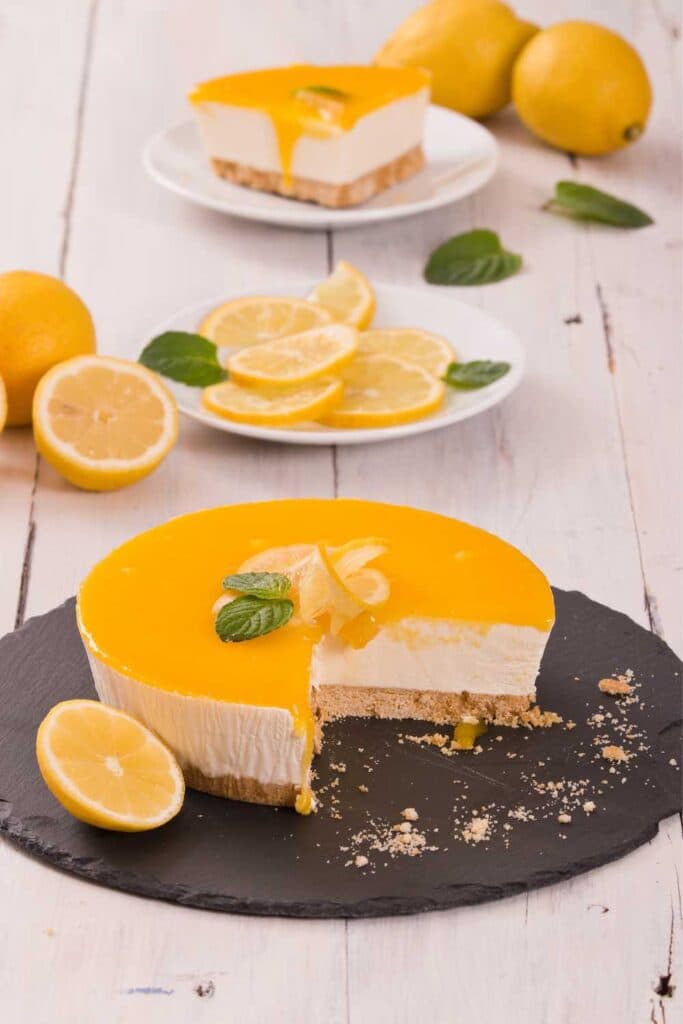
Mary Berry Lemon Curd Cheesecake is a smooth, creamy, and irresistibly bright dessert that brings together a buttery biscuit base, a velvety cream cheese filling, and a glossy swirl of tangy lemon curd. The result is a refreshing cheesecake that feels rich yet light, with a vibrant citrus lift in every bite.
This recipe is perfect for celebrations, weekend gatherings, or when you simply want a dessert that looks impressive but is surprisingly easy to make. With straightforward ingredients and no complicated techniques, this cheesecake delivers a reliable and luxurious dessert every time.
What Is Mary Berry Lemon Curd Cheesecake?
Mary Berry Lemon Curd Cheesecake is a creamy baked or no-bake cheesecake made with cream cheese, sugar, biscuits, and homemade lemon curd. The lemon curd adds a sharp yet balanced citrus flavour that cuts through the richness of the cheesecake beautifully.
Other Popular Mary Berry Recipes
Why This Recipe Is Worth Trying
- Deliciously creamy filling balanced with bright lemon flavour
- Simple ingredients that come together quickly
- Stunning swirl effect using lemon curd
- Ideal make-ahead dessert that sets beautifully
- Elegant enough for dinner parties but easy enough for everyday baking
Essential Ingredients to Make Mary Berry Lemon Curd Cheesecake
For the Base:
- 250g digestive biscuits, crushed
- 100g butter, melted
For the Cheesecake Filling:
- 400g full-fat cream cheese
- 200ml double cream
- 120g caster sugar
- 2 tbsp lemon zest
- 2 tbsp lemon juice
- 1 tsp vanilla extract
For the Lemon Curd Layer (or use homemade):
- 4–5 tbsp lemon curd
Handy Kitchen Tools for Best Results
- 20cm springform tin
- Food processor or rolling pin
- Mixing bowls
- Electric whisk
- Spatula
- Zester and juicer
- Small saucepan (if making curd)
- Cooling rack
Step-by-Step Guide to Making Mary Berry Lemon Curd Cheesecake
Step 1: Prepare the biscuit base
Crush the digestive biscuits into fine crumbs, mix with melted butter, and press firmly into the base of a springform tin.
Step 2: Chill the base
Place the tin in the fridge for at least 15 minutes so the base becomes firm and holds together well.
Step 3: Whisk the cream cheese
Beat the cream cheese and caster sugar until smooth, creamy, and free of lumps.
Step 4: Add the lemon flavour
Mix in the lemon zest, lemon juice, and vanilla extract, blending until evenly combined.
Step 5: Whip the cream
Whisk the double cream until it forms soft peaks, then fold it gently into the cheesecake mixture.
Step 6: Pour into the tin
Spoon the filling over the chilled biscuit base, smoothing the top with a spatula.
Step 7: Swirl or layer the lemon curd
Warm the lemon curd slightly so it spreads easily, then swirl it over the top or add a thin layer on top of the filling.
Step 8: Chill the cheesecake
Refrigerate for at least 4 hours—or overnight—for perfect slicing and a stable texture.
Step 9: Slice and serve
Run a warm knife around the edges, release the tin, and enjoy your light, creamy lemon cheesecake.

What I Got Wrong (And How I Fixed It)
- Base crumbled — pressing firmly with the back of a spoon helped it set
- Filling felt too loose — chilling overnight gave the perfect firmness
- Lemon flavour was too mild — adding extra zest brightened the taste
- Curds sank — lightly warming and drizzling at the end fixed the appearance
Healthier Version of Mary Berry’s Lemon Curd Cheesecake
You can create a lighter version by using reduced-fat cream cheese, swapping double cream for Greek yogurt, or reducing sugar slightly. The lemon flavour keeps the cheesecake tasting fresh even with lighter ingredients.
Ingredient Substitutions for Mary Berry Lemon Curd Cheesecake
- Swap digestives for ginger biscuits for a warm spice twist
- Use lime curd instead of lemon for a tropical flavour
- Replace double cream with mascarpone for a richer texture
- Add crushed almonds to the base for a nutty crunch
- Use vanilla bean paste for a deeper flavour
Pairing Ideas: What to Serve With Mary Berry Lemon Curd Cheesecake
- Fresh berries – Adds colour and natural sweetness
- Whipped cream – Light and airy complement
- Mint leaves – Freshens the palate nicely
- Berry coulis – Provides a sweet-tart contrast
- Hot herbal tea – Balances the richness perfectly
Expert Tips to Make Perfect Lemon Curd Cheesecake
- Use full-fat cream cheese for the best structure and texture
- Whip cream to soft peaks so the filling stays light
- Do not overmix to keep the cheesecake smooth
- Warm the curd slightly for clean swirling
- Chill long enough to allow the cake to set fully
- Line the tin base for clean and easy removal
Creative Ways to Customize Mary Berry Lemon Curd Cheesecake
- Add a blueberry swirl for colour and flavour
- Top with candied lemon slices for decoration
- Create a layered effect by adding curd between filling layers
- Mix in white chocolate for added richness
- Turn into mini cheesecakes for individual servings
Storing Mary Berry Lemon Curd Cheesecake the Right Way
- Refrigerate for up to 4 days in a sealed container
- Freeze slices for up to 2 months, wrapped well
- Thaw in the fridge for the best texture
- Avoid leaving out for long periods to maintain firmness
How to Reheat Cowboy Caviar (If Needed)
Cowboy caviar is served chilled; reheating is unnecessary.
Nutritional Breakdown (per serving)
- Calories: ~360
- Fat: 24g
- Carbohydrates: 32g
- Protein: 5g
- Sugars: 26g
Mary Berry Lemon Curd Cheesecake

Mary Berry Lemon Curd Cheesecake is a creamy baked or no-bake cheesecake made with cream cheese, sugar, biscuits, and homemade lemon curd. The lemon curd adds a sharp yet balanced citrus flavour that cuts through the richness of the cheesecake beautifully.
- Prep Time: 10
- Total Time: 10 minutes
- Category: Dessert
- Method: No-bake
- Cuisine: British
Ingredients
For the Base:
-
250g digestive biscuits, crushed
-
100g butter, melted
For the Cheesecake Filling:
-
400g full-fat cream cheese
-
200ml double cream
-
120g caster sugar
-
2 tbsp lemon zest
-
2 tbsp lemon juice
-
1 tsp vanilla extract
For the Lemon Curd Layer (or use homemade):
-
4–5 tbsp lemon curd
Instructions
Crush the digestive biscuits into fine crumbs, mix with melted butter, and press firmly into the base of a springform tin.
Place the tin in the fridge for at least 15 minutes so the base becomes firm and holds together well.
Beat the cream cheese and caster sugar until smooth, creamy, and free of lumps.
Mix in the lemon zest, lemon juice, and vanilla extract, blending until evenly combined.
Whisk the double cream until it forms soft peaks, then fold it gently into the cheesecake mixture.
Spoon the filling over the chilled biscuit base, smoothing the top with a spatula.
Warm the lemon curd slightly so it spreads easily, then swirl it over the top or add a thin layer on top of the filling.
Refrigerate for at least 4 hours—or overnight—for perfect slicing and a stable texture.
Run a warm knife around the edges, release the tin, and enjoy your light, creamy lemon cheesecake.
FAQs
Why is my lemon curd cheesecake not setting properly?
A lemon curd cheesecake fails to set when the filling is under-mixed or not chilled long enough. Folding the whipped cream gently into the cream cheese and chilling the cheesecake for at least 4 hours—preferably overnight—helps it firm up perfectly.
How do I stop the biscuit base from crumbling when slicing?
A crumbly base happens when the biscuit mixture isn’t pressed down firmly. Pressing the mixture tightly with the back of a spoon and chilling it well before adding the filling creates a firm, sliceable base.
Why does my lemon curd sink instead of staying on top?
Lemon curd sinks when it’s too cold or too thick. Slightly warming the curd before adding it makes it spread more evenly and sit neatly on the surface of the cheesecake.
How can I make my lemon cheesecake more lemony?
Increasing the lemon zest, adding an extra tablespoon of lemon juice, or swirling additional lemon curd on top boosts the cheesecake’s citrus flavour without affecting the texture.
Wrapping It Up
Mary Berry Lemon Curd Cheesecake is a wonderfully creamy, bright, and refreshing dessert that combines a buttery base, a velvety filling, and a burst of lemon flavour. It’s easy, elegant, and perfect for any occasion.